The tree reflects the arrangement of your archives, from the general to the specific (ISAD(G) 2.1): a fonds contains series, which contain sub-series, files and finally items. Each level has an abbreviation shown in the tree:
| Level | Abbreviation | Note |
|---|---|---|
| Collection | C | can be a root, like a fonds |
| Fonds | F | root of the tree |
| Sub-fonds | SF | can repeat (a sub-fonds within a sub-fonds) |
| Series | S | |
| Sub-series | SS | can repeat |
| File | D | can repeat |
| Item | P | cannot have children |
Memory Atlas refuses inconsistent placements: an item cannot take a child, a level cannot be placed above a more general level, and a branch cannot be moved into one of its own descendants.
Create the fonds
In an empty repository, click Create a fonds in the center column (or ⌘N). The fonds appears in the sidebar, in the Archives section, and in the tree, with the temporary title “Untitled.” Give it its title: type “Photographic fonds” in the Title field of the description, on the right.
The Reference code(s) field gives the unit’s own reference code segment: for Léa’s fonds, PH. The full reference code (FR-STX/PH) is computed below it, from the repository identity and the segments of the ancestors.
Create the series, files and items
Select a unit in the tree, then:
- New Child Unit (⌘N, or the + button in the toolbar) creates a unit under the selection. The suggested level is the next one down in the hierarchy (a series under a fonds, a file under a sub-series…), and the reference code segment is the first free number.
- New Sibling Unit (⌥⌘N) creates a unit at the same level, right after the selection.
This is how Léa creates, under the fonds, the five series “Personal projects,” “Commissions,” “Exhibitions,” “Publications” and “Correspondence” (reference codes FR-STX/PH/1 to /5), then under “Personal projects” the sub-series “Project A — Lisières” (segment A) and “Project B — Rivages” (segment B), and finally the four files of Project A: “Research” (REC), “Negatives” (NEG), “Scans” (SCN) and “Prints” (TIR).
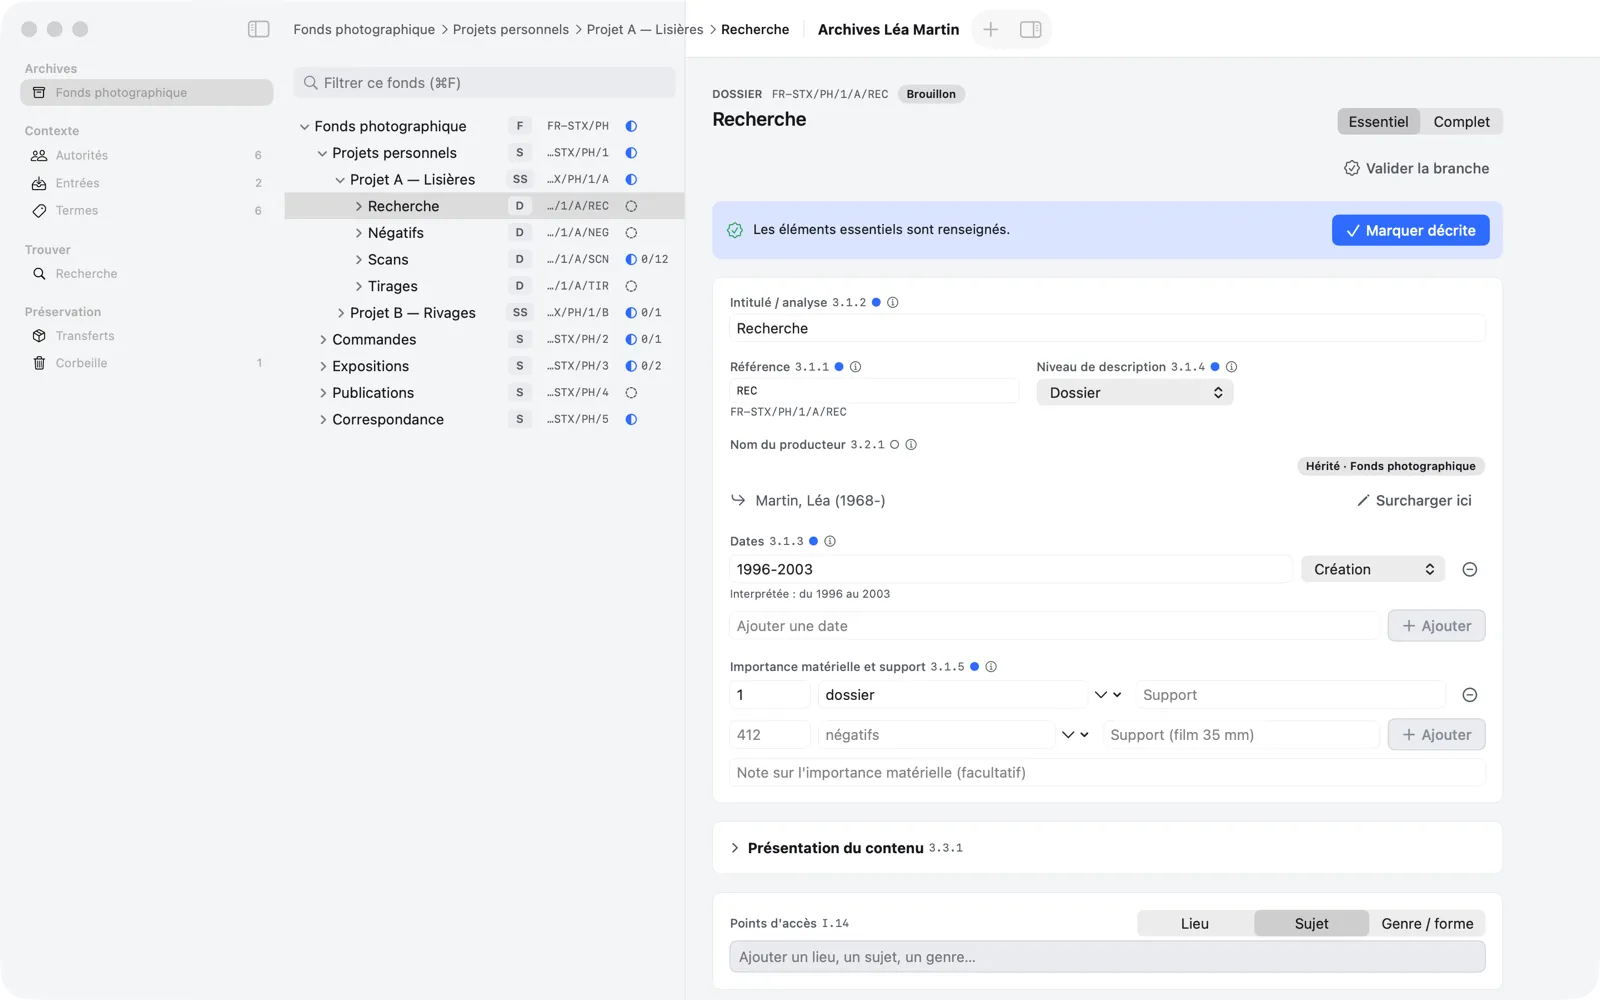
Each row of the tree shows, from left to right:
- the title;
- the abbreviation of the level;
- the full reference code;
- the status, with a symbol of a different shape for each: a dashed circle (“Draft”), a half-filled circle (“Arranging”), a solid dot (“Described”), a checkmark in a circle (“Validated”), a package (“Ready for preservation”), a checkmark seal (“Transferred”). On a collapsed row, the number of validated descendants out of their total is added (for example
0/16); - the number of digital objects.
If the last columns are cut off, widen the tree column by dragging its right edge. Right-clicking in the tree, on a row or in an empty area, gives access to the Columns submenu, which hides or shows the Level, Reference code, Status and Digital objects columns. Row height is set in Settings › General › Tree density (Compact, Comfortable, Spacious).
The context menu of a unit
Right-clicking a unit offers:
- New Child Unit, New Sibling Unit;
- Rename (or ↩ on the selected row): you edit the title directly in the tree;
- Move To…: choose a new parent with the keyboard (see below);
- Change Level, with the list of levels (the current level is checked);
- Move to Trash;
- Columns.
Navigate the tree
- The ↑ ↓ arrows move the selection, → and ← expand and collapse; ⌥→ expands the whole branch.
- The breadcrumb in the toolbar shows the path of the selected unit; click a level to go to it.
- Go › Back (⌘[) and Forward (⌘]) step through the history of your selections.
- Filter this fonds (⌘F), at the top of the tree, keeps only the units whose title or reference code contains the text you type, along with their ancestors. Escape clears the filter. To search the whole repository, use global search.
If the repository holds several fonds, choose one in the sidebar; Go › Fonds (⌘1) returns to the tree from another destination.
Move a unit or a branch
- Dragging and dropping a row onto another unit in the tree moves it into that unit, with its whole branch. You can also drop it on a fonds in the sidebar.
- Unit › Move To… (⇧⌘M), also in the context menu and the ⌘K palette, moves the selected unit without the mouse. Type part of the title or reference code of the new parent, or of the title of one of its ancestors (the name of a series finds its files), choose it with ↑ ↓, then Move Here (↩): the unit becomes its last child. Only the parents that drag and drop would accept are offered; the current parent and a parent that already has a unit with the same reference code are shown dimmed, with the reason. Under each row, the path of its ancestors (“Photographs › Negatives”) tells apart two units with the same title.
- Unit › Move Up (⌃⌘↑) and Move Down (⌃⌘↓) change the order among sibling units.
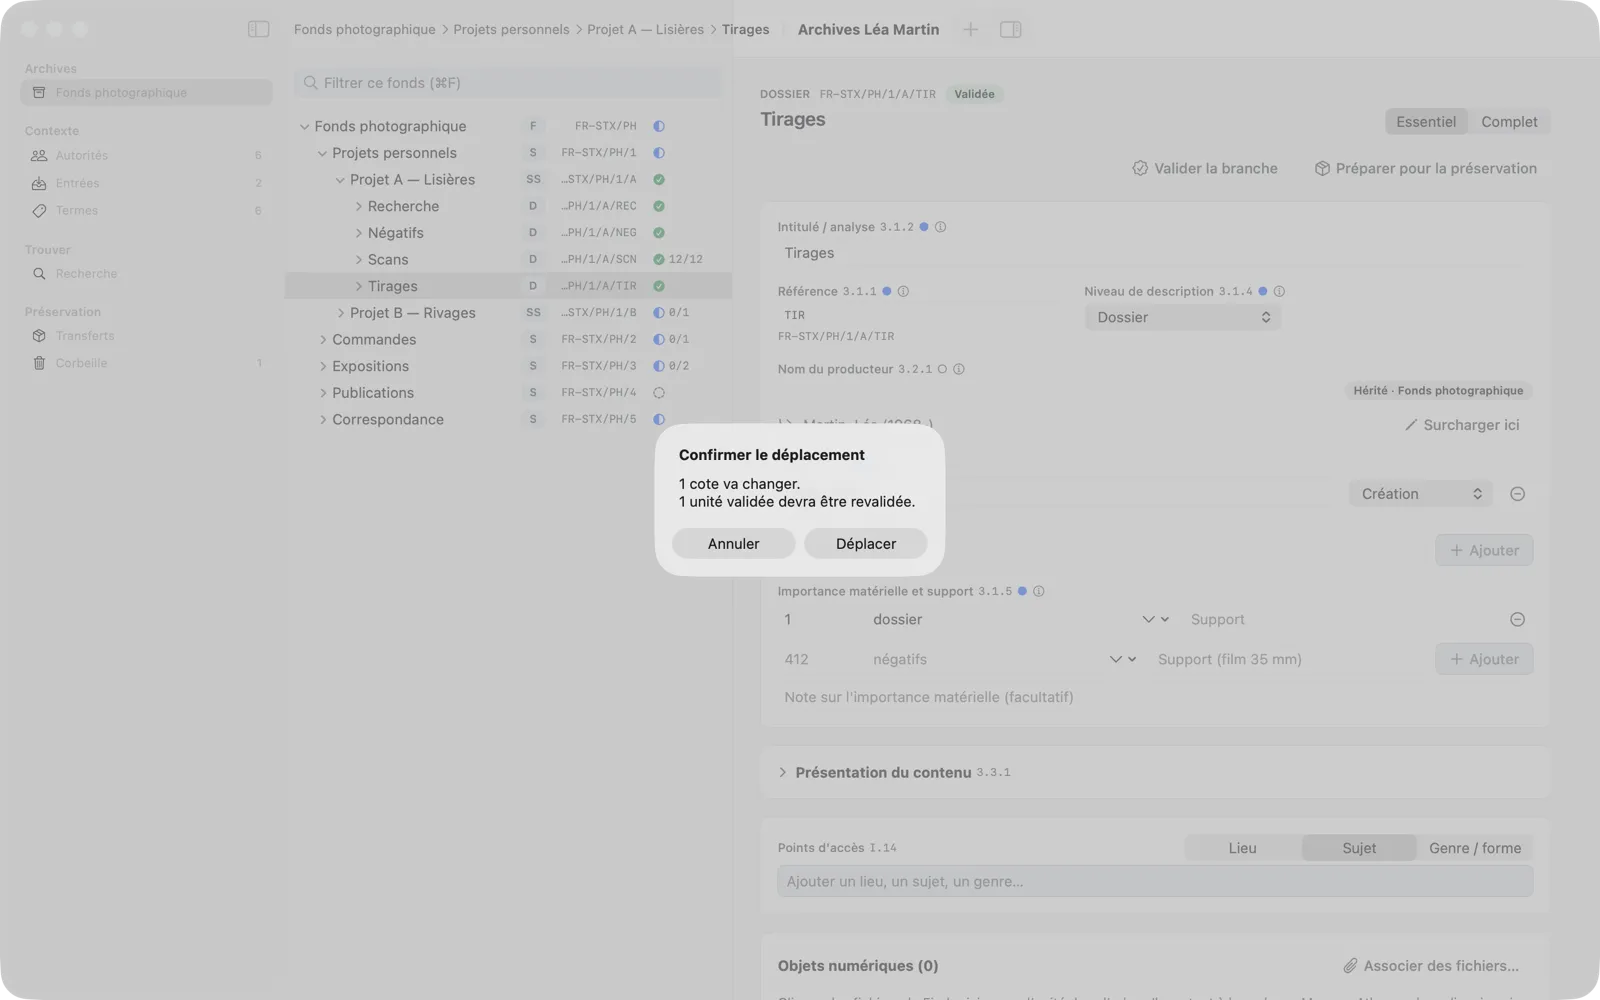
A move recomputes the reference codes of the branch. When it has consequences, Memory Atlas asks for confirmation and spells them out: reference codes that change, validated units that will need to be validated again, units already transferred that are affected, a change of fonds (and therefore of provenance).
A branch being exported (status “Ready for preservation”) cannot be moved, moved to the Trash, or receive new units.
The Trash
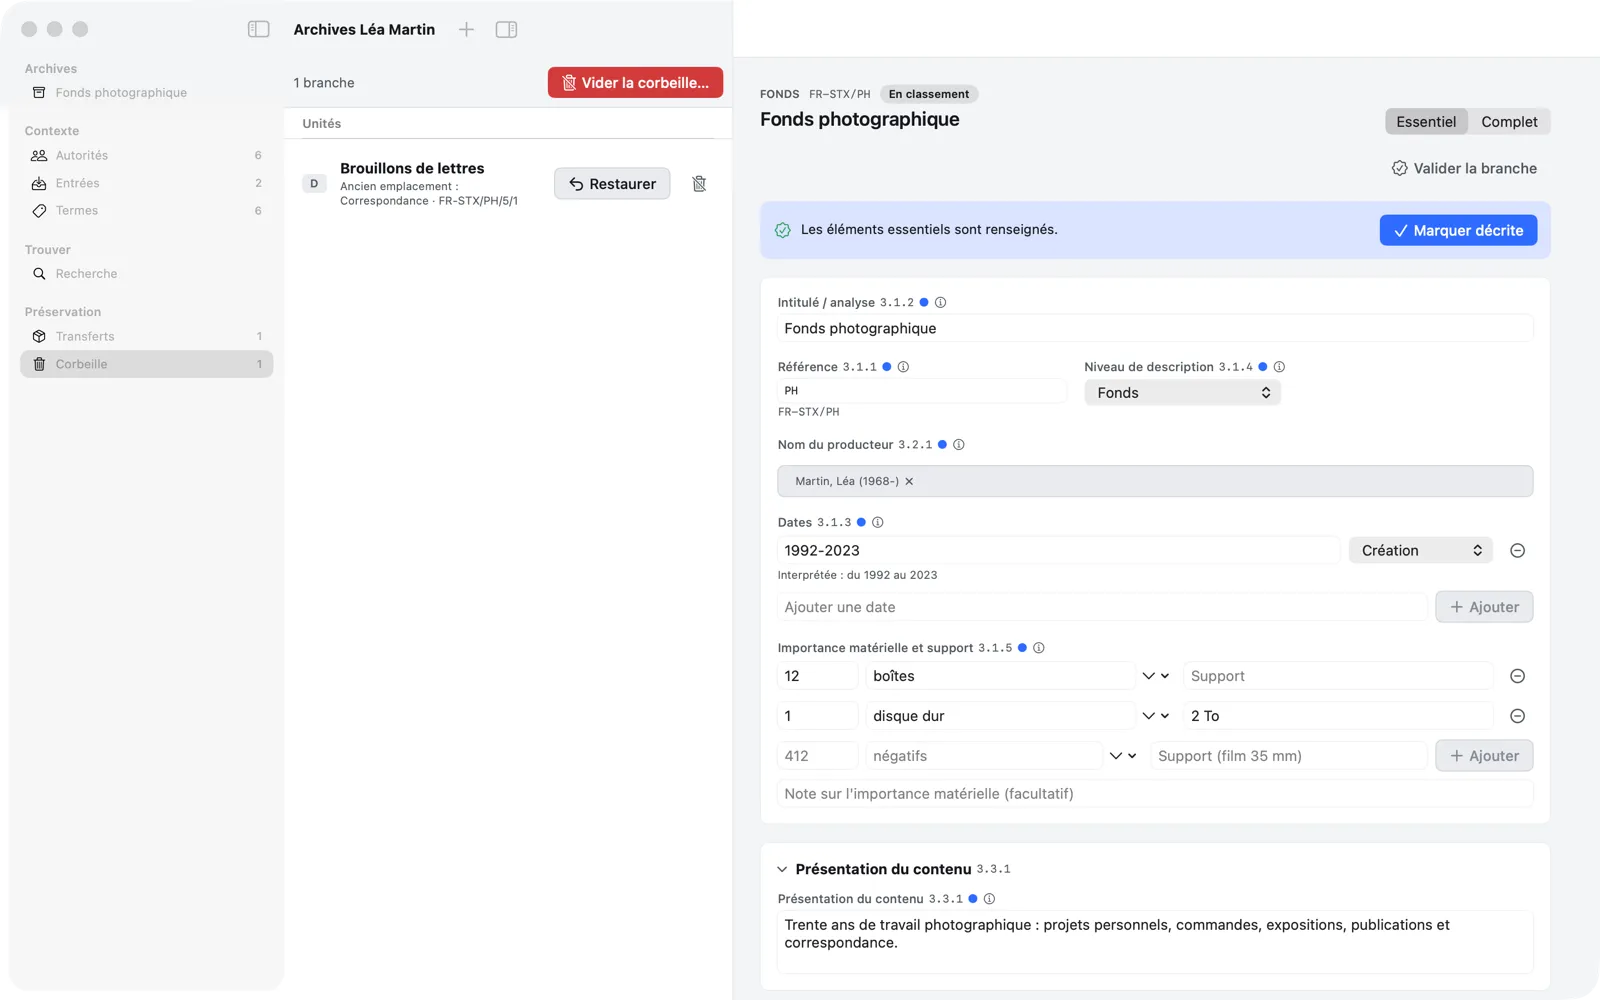
Move to Trash (⌘⌫) removes the selected unit and its whole branch from the tree. Nothing is erased: the Trash destination in the sidebar lists the removed branches, with their former location and their number of units. Restore puts the branch back in its former place.
Like any change, moving something to the Trash can also be undone with ⌘Z.